








User Guide
Hide your attachments. Document Vault offers a secure attachment repository that can be hidden from all but a select user group.
Limitations: Document Vault for Jira cloud has a 50mb file size limit for attachments.
Data and File Storage: All data and files are stored within Jira. No information or files are stored on Redmoon Software servers
Document Vault on Issues
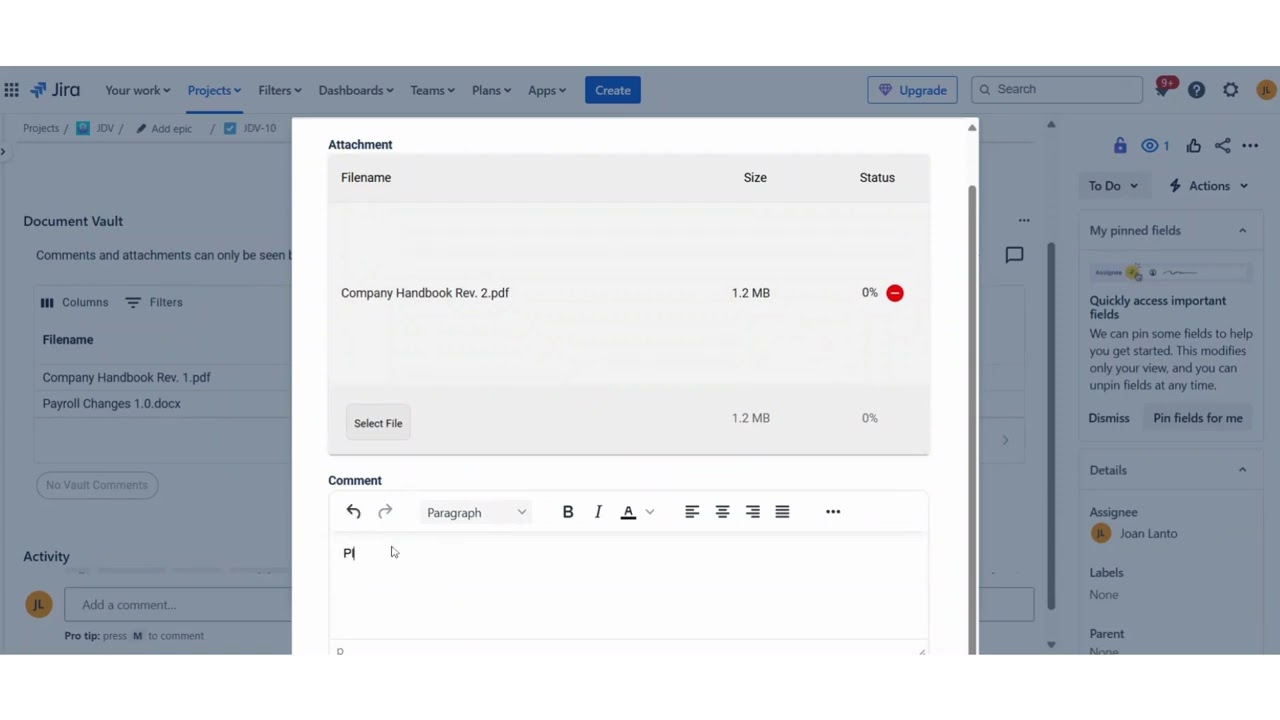
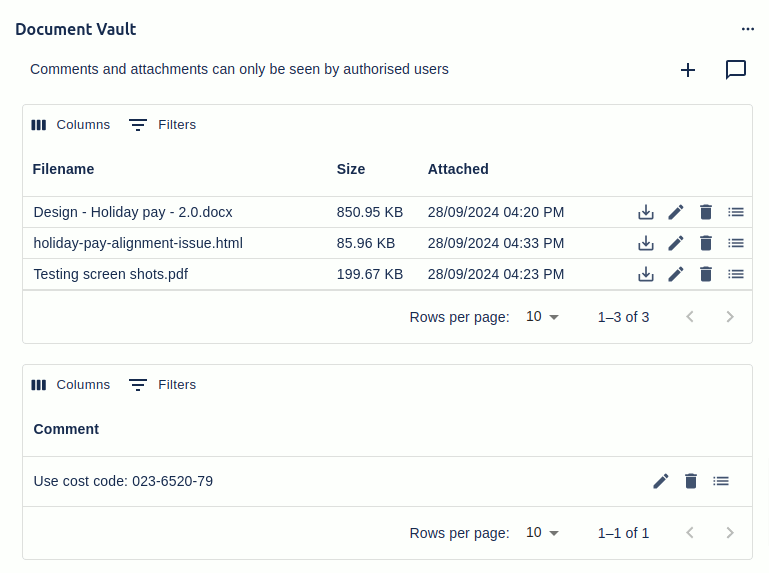
On an Issue, the Document Vault panel is displayed below the description on an Issue.
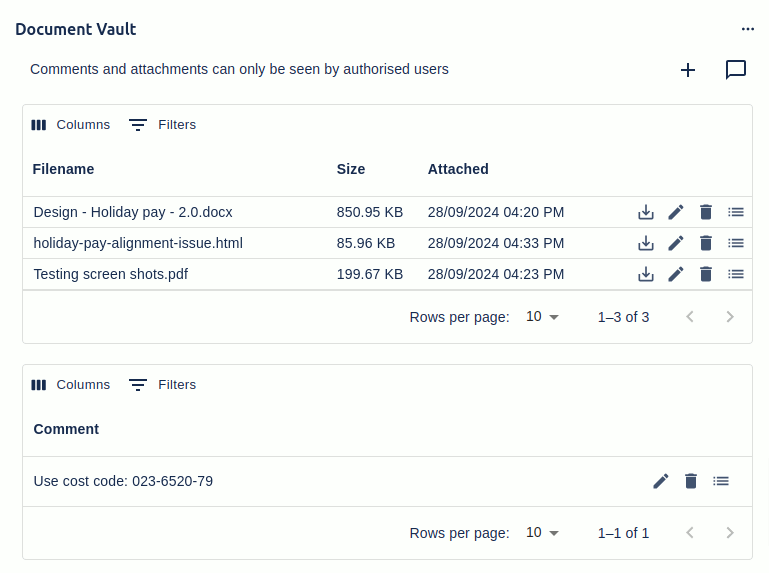
If the Document Vault panel is not shown then you will need to click on Apps -> Document Vault, as shown below

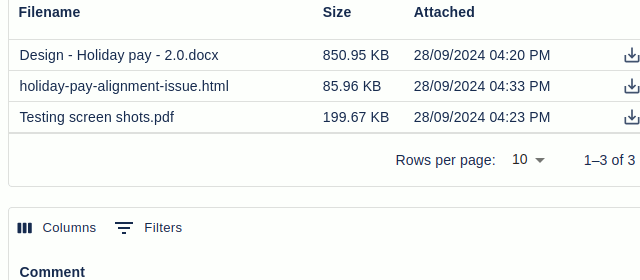
The Document Vault panel allows you to add attachments, with or without a comment, and standalone comments. The attachments and comments are only visible to users authorised from the Admin Document Vault configuration page (see below).
Clicking on the attachment’s name will download the attachment. To the right-hand side of each attachments details, are four buttons for updating the attachment, editing the comment, deleting the comment and viewing details about the attachment, including its comment.
Adding Attachments
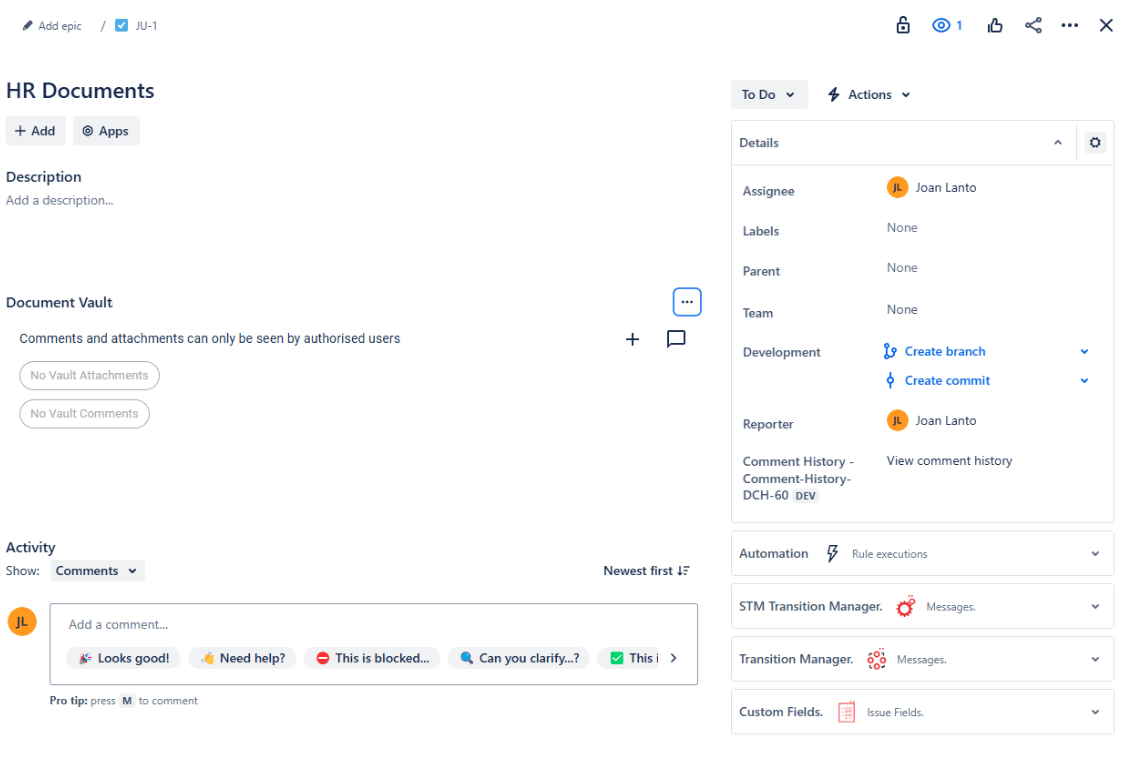
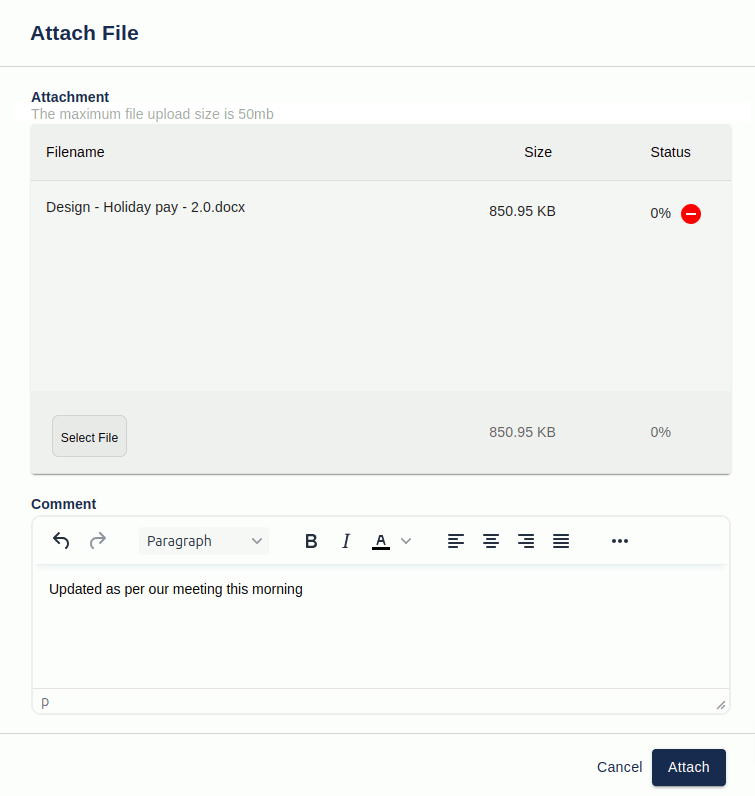
Attachments can be added by clicking on the “+” button. This will open up the Attach File dialog shown below.
Users can upload multiple files simultaneously by using Select File button or dragging and dropping the files in.
Please note that if a comment is provided during a multi-file upload, the same comment will be applied to all selected files.
Once one or more attachments are added, click the Attach button. The files will be uploaded into Jira. Note all attachments are stored in Jira and not on external servers.
Update Attachment
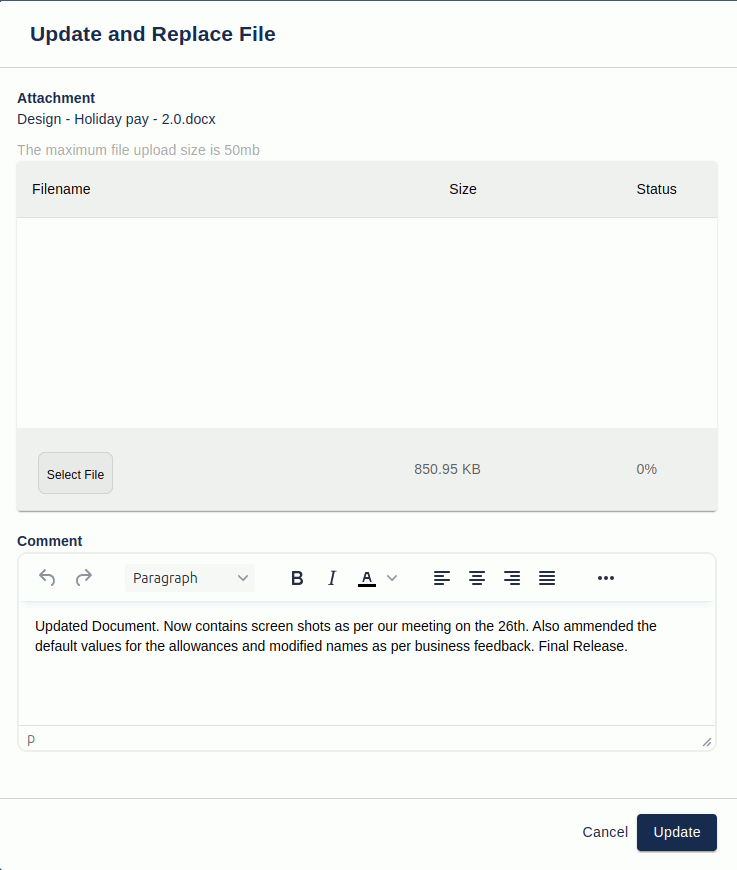
Updating an attachment will replace the current version with a new one. The updated attachment does not need to retain the same file name.
To update an attachment, click on the icon featuring a downward-pointing arrow located on the right side of the attachment. This action will open the dialog box displayed below. Additionally, you can edit the comment at the same time.
Edit Attachment Comment
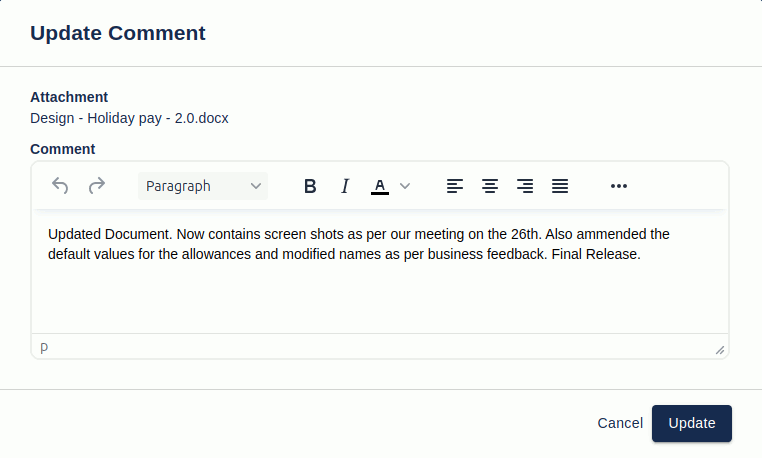
An attachment has an optional comment that can be shown (only if present) by clicking on the attachments details button (the last of the four icon buttons in the main Document Vault panel). The comment can be edited or created (if it doesn’t already exist) by clicking on the pencil icon, the second of the four icon buttons on the main Document Vault panel.
Delete Attachment
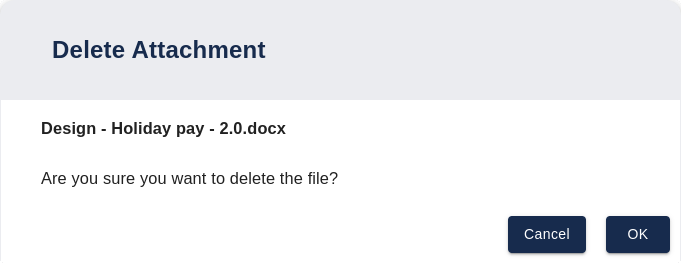
An attachment can be deleted by clicking on the trash bin icon, the third of the four icon buttons in the main Document Vault panel. You will be prompted to confirm the deletion, after which the attachment will be permanently removed.
Standalone Comments
Document Vault has a section for standalone comments on the main Document Vault panel.
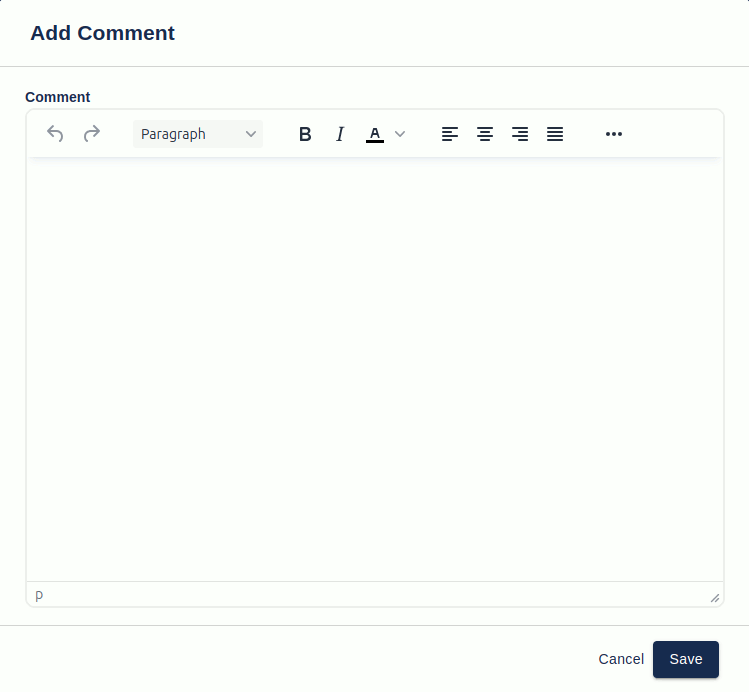
Clicking on the comment icon, at the top of the Document Vault panel, will open the following dialog.
Admin Configuration
The admin Document Vault page allows an administrator to specify:
- The storage project for Document Vault attachments
- Which user groups/project roles a user must belong to before they can use the full access to Document Vault functionality
- Which user groups/project roles a user must belong to before they can use the read-only access Document Vault functionality
- What types of file extension in the respective fields to use
- Send email notifications when a file is attached to Full access users, Read-only access users and/or the Issue assignee
- Activate Document Vault for all projects or individual projects
- Customize the message displayed when a user does not have permission to see Document Vault attachments and comments
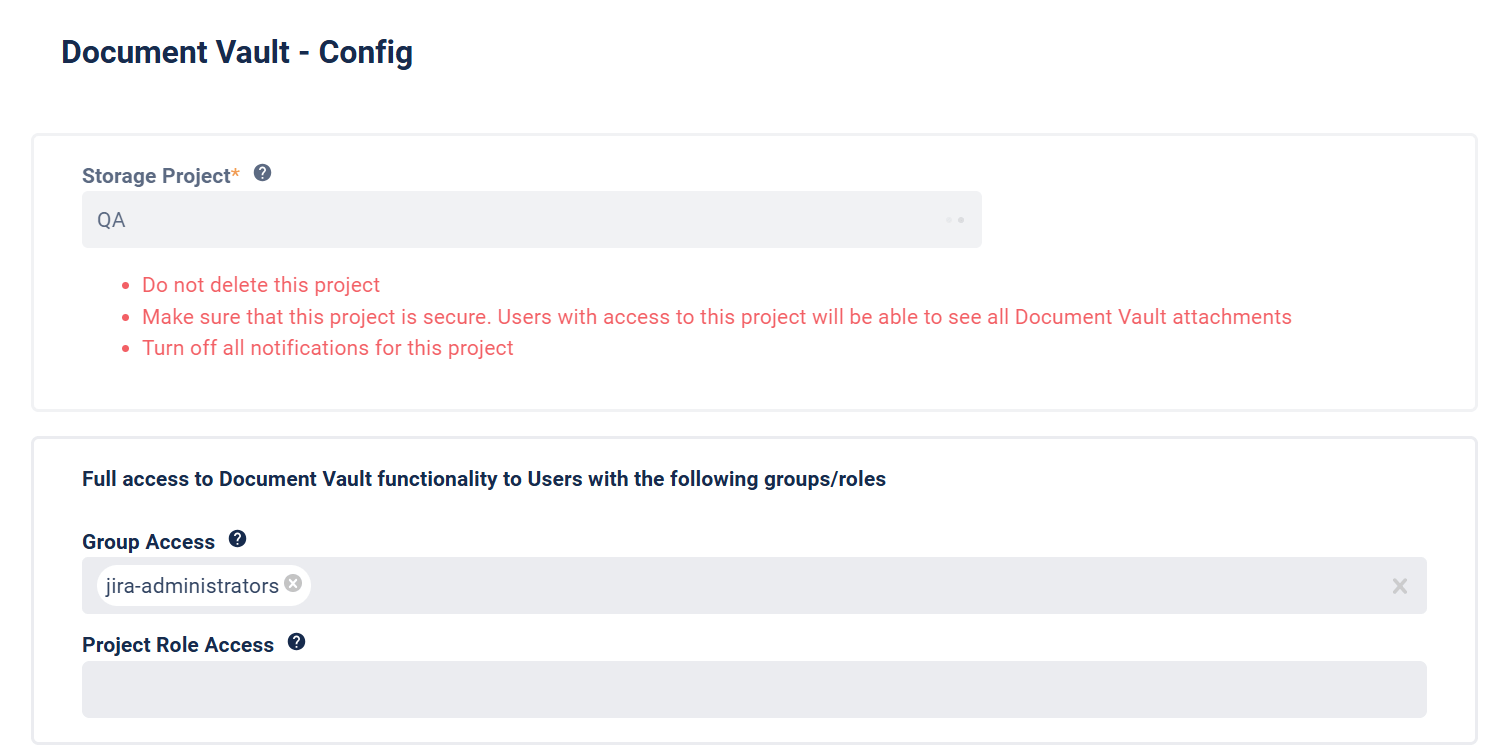
Storage Project
Document Vault uses a secure project within your Jira instance to store all attachments, ensuring that no attachments or data are stored on Redmoon Software servers. This keeps all your files safely within your Jira environment.
To maintain security, the storage project should be restricted to the smallest possible number of users and notifications should be turned off for the project. Anyone with access to this project will have access to all Document Vault attachments, so it’s critical to limit permissions accordingly.
Note: The storage can not be changed once it has been set.
Full Document Vault functionality to Users to the following groups/roles
Specify which user groups and project roles a user must belong to before they can see and use all the functionality of Document Vault. If both the user group and project role access fields are empty then no one will be able to add/edit/delete attachments and comment in Document Vault. The Document Vault panel in Issues shows regardless of whether a user has access to Document Vault but none of the attachments and comments are visible unless the user is in one of the specified user groups, project roles or have read-only access.
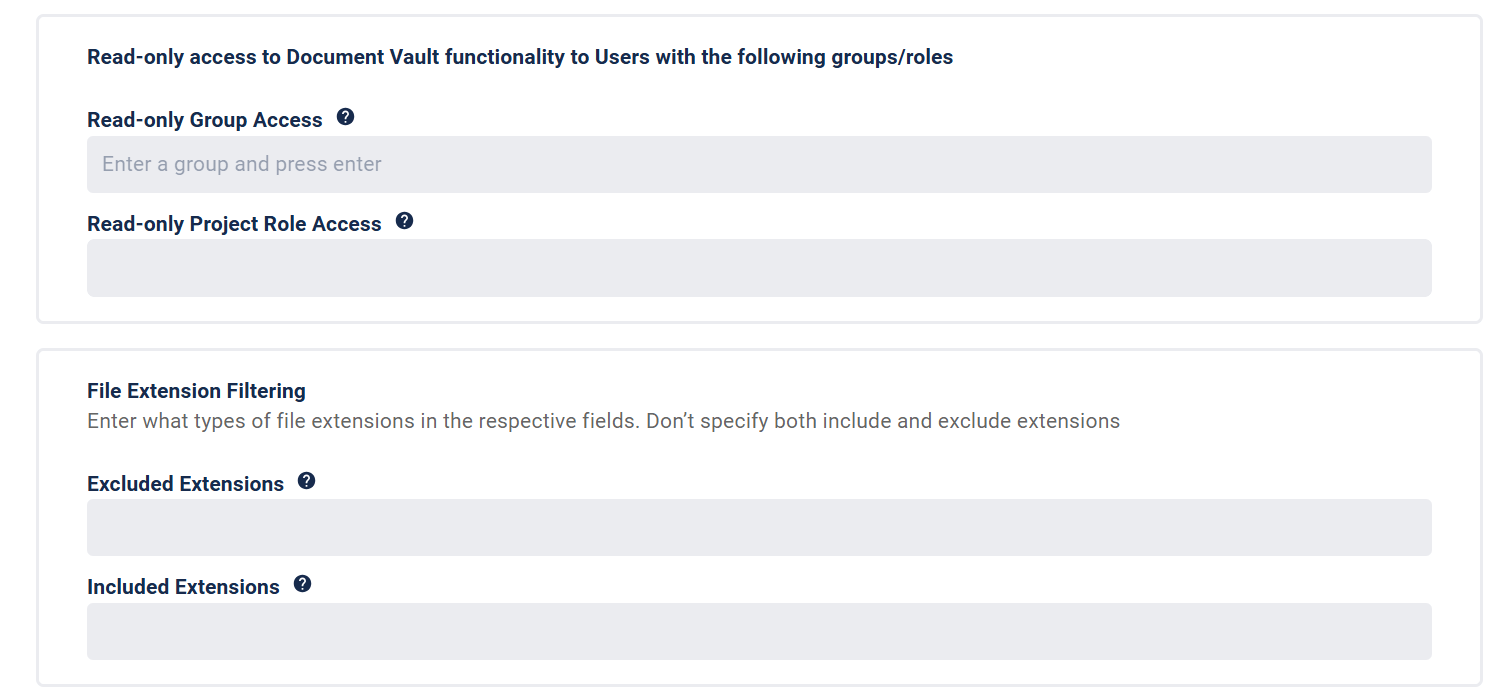
Read-only access to Document Vault functionality to Users with the following groups/roles
Specify which user groups and project roles a user can belong to so they can see Document Vault information and/or download attachments. If both the user group and project role access fields are empty then no one will have read-only access to use Document Vault. The Document Vault panel in Issues shows regardless of whether a user has access to Document Vault but none of the attachments and comments are visible unless a user belongs to one of the user groups or project roles in the full or read-only access sections.
File Extension Filtering
You can specify the file extensions that a file can or can’t have. For excluded extensions, list the file types that attachments must NOT have (e.g., zip, jar, doc). For included extensions, list the file types that attachments must have (e.g., gif, png, jpg).
Note: Don’t specify both include and exclude extensions
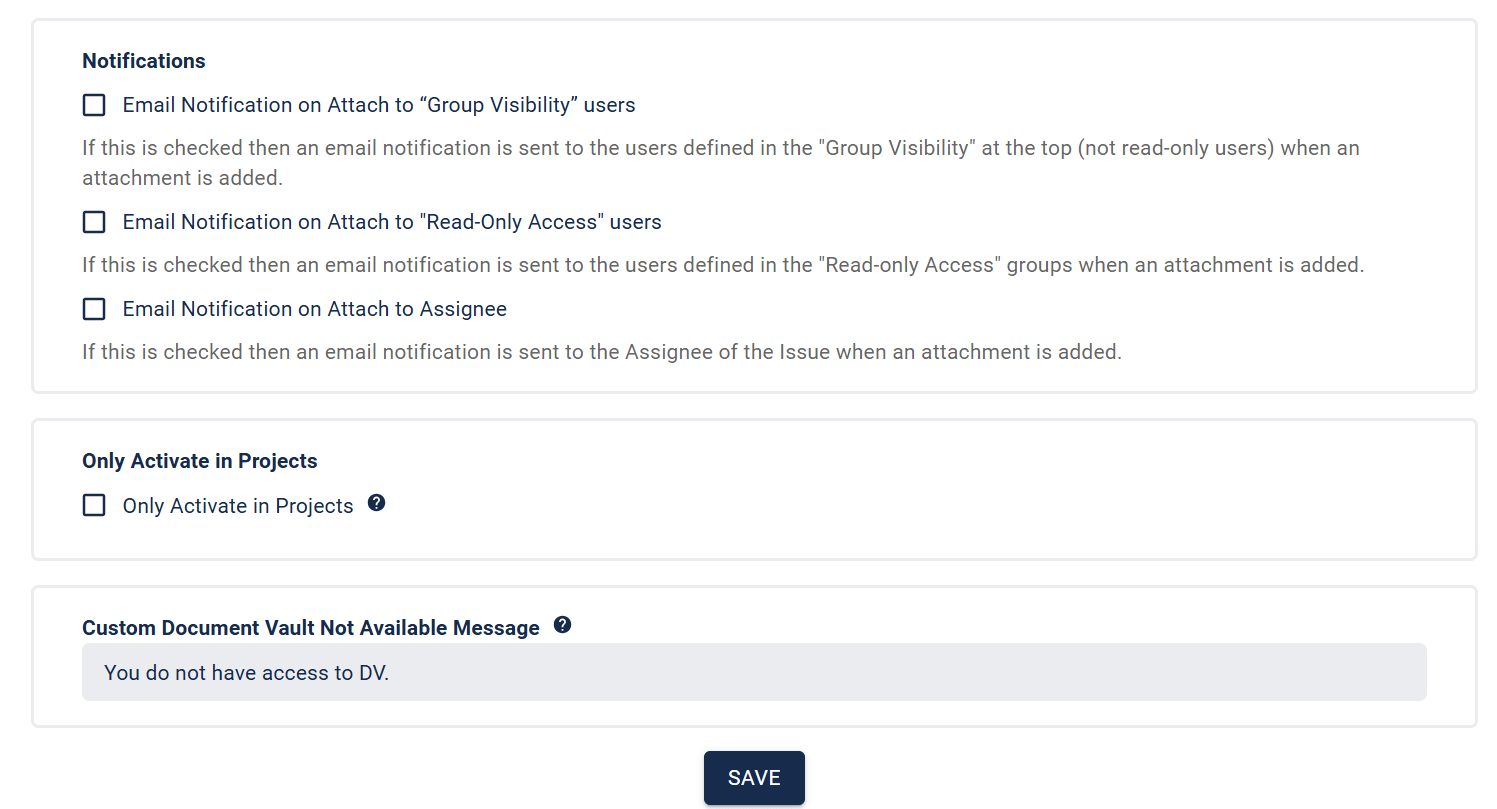
Notifications
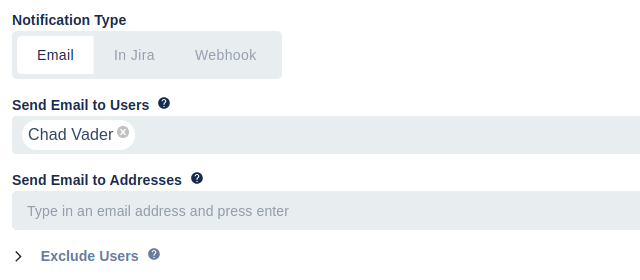
When an attachment is added, you can notify the users that are in the full access user groups, read-only access user groups, or the assignee of the issue.
Only Activate in Projects
By default Document Vault is available to user, with the right access, all projects. The ‘Only Activate in Projects’ checkbox, if checked, allows you to only activate Document Vault in particular projects. Once this is checked you need to also check the ‘Activate for this Project’ checkbox in the projects configuration page (see below for more details).
Custom Document Vault Not Available Message
With this field, you can specify a custom message to be displayed for users who don’t have access to Document Vault.
Because of constraints in the Jira development platform we use, the Document Vault panel is available to everyone. If a user doesn’t have access to the attachments and comments (through group and project role access), they will be shown a message saying that they do not have permission to see Document Vault attachments. This field allows you to customize that message
For example, if users that don’t have access to the Document Vault attachments complain that they should have access then you could customize the message to “No attachments found”. This would give them the impression that they have access but there is no attachments.
Another example is if users can request to see the Document Vault attachments then the message could say “You do not have access to these attachments. If you need access then please contact your Jira administrator.”
Project Configuration
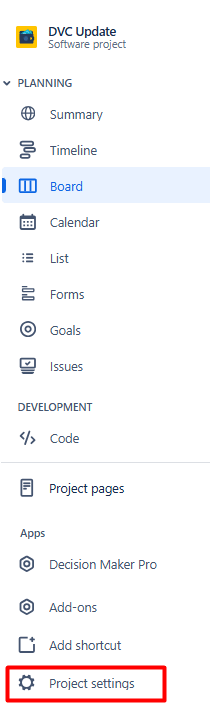
Document Vault also has a project configuration page. This can be viewed by going to a project, as a project or Jira admin, and selecting Project Settings and then, under Apps, clicking on Document Vault.
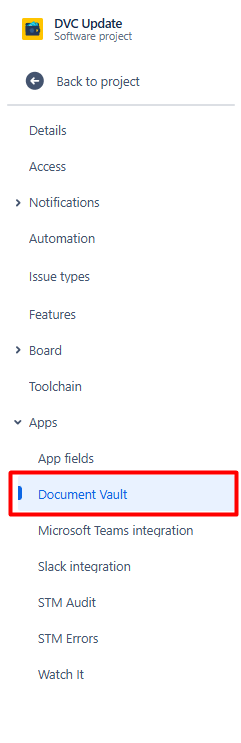
For Project Configuration, there is only one option, and this is only shown if “Only Activate in Projects” is checked on the global configuration page. If “Only Activate in Projects” is checked, Document Vault will only be available in Projects where ‘Activate for this Project’ is also checked.
Note: For further information, please refer to the “Only Activate in Projects” section of the global configuration page.

REST API
In addition to the Document Vault panel, attachments can be listed and uploaded programmatically through a REST API. This is useful for automating uploads from scripts or integrating Document Vault with other tools.
The API honours the same access rules as the Document Vault panel: a user can only list or download attachments on an issue if they have full or read-only access, and can only upload if they have full access. Attachments and comments are never exposed to users outside the configured access lists.
The API provides the following endpoints:
GET /issue/{issueIdOrKey}/attachments– list all Document Vault attachments on an issueGET /issue/{issueIdOrKey}/attachments/{attachmentId}– fetch a single Document Vault attachment by idPOST /issue/{issueIdOrKey}/attachments?comment={comment}– upload one or more files to an issue
In the examples below, {issueIdOrKey} is a Jira issue key (for example PROJ-123) or its numeric issue id.
Web Trigger URL
In the REST API examples below, <WEBTRIGGER_URL> is a placeholder for your Jira REST API URL. You can find the correct value on the Config page under REST API URL and should substitute it wherever <WEBTRIGGER_URL> appears.
Authentication
The endpoints are not anonymous public APIs. Because Document Vault runs on Atlassian Forge, every request must be made on behalf of a Jira user who already has an active, authenticated Document Vault session. Each request requires a basic auth token, passed in the Authorization header:
Authorization: Basic <BASIC_AUTH_TOKEN>Log into my.atlassian.com and then go to Security -> Create and Manage API tokens. Click on “Create API Token”. That token needs to be encoded as base64 using username:token where username is your username and token is the token from Jira. That then replaces <BASIC_AUTH_TOKEN> in the examples below.
List all attachments on an issue
curl -i \
  -H "Accept: application/json" \
  -H "Authorization: Basic <BASIC_AUTH_TOKEN>" \
  "<WEBTRIGGER_URL>/issue/PROJ-123/attachments"
A successful request returns 200 with wasSuccessful: true and an attachments array containing only the attachments belonging to that issue.
Get a single attachment
Supply a Document Vault attachment id belonging to the issue:
curl -i \
  -H "Accept: application/json" \
  -H "Authorization: Basic <BASIC_AUTH_TOKEN>" \
  "<WEBTRIGGER_URL>/issue/PROJ-123/attachments/<ATTACHMENT_ID>"
A successful request returns 200 with wasSuccessful: true and an attachment object whose attachmentId matches the requested id.
Upload a file
Uploads are performed in two steps: first create an upload session, then send the file to the upload URL the session returns. Document Vault finalises the attachment itself — there is no separate “complete” call.
This two-step approach is required because of the limitations of Atlassian’s Forge development framework, which does not allow file data to be passed directly through the app. To handle this securely, the upload is routed through a separate service and sensitive information is protected using public/private key encryption.
Step 1 — Create an upload session. POST the file’s metadata to the upload-session endpoint:
curl -i \
  -X POST \
  -H "Accept: application/json" \
  -H "Authorization: Basic <BASIC_AUTH_TOKEN>" \
  -H "Content-Type: application/json" \
  -d '{
    "filename": "large-report.pdf",
    "mimeType": "application/pdf",
    "comment": "uploaded from api"
  }' \
  "<WEBTRIGGER_URL>/issue/PROJ-123/attachments/upload-session"
A successful request returns 200 with the session details:
{
  "wasSuccessful": true,
  "sessionId": "a3f96e19-03a5-4d98-9803-791d2d1179fe",
  "uploadUrl": "<UPLOAD_URL>",
  "uploadAccessToken": "<UPLOAD_ACCESS_TOKEN>",
  "expiresInSeconds": 60
}
Pass comment here, in step 1 — it is stored when the upload completes. Always use the uploadUrl returned in the response rather than hardcoding it; the URL may change over time, so reading it from the response means your integration keeps working without any changes. The uploadAccessToken expires in about 60 seconds, so run step 2 immediately.
Step 2 — Upload the file. Send the file as multipart/form-data to the uploadUrl returned in step 1, along with the sessionId and uploadAccessToken:
curl -i \
  -X POST \
  -F "file=@./large-report.pdf;type=application/pdf" \
  -F "sessionId=a3f96e19-03a5-4d98-9803-791d2d1179fe" \
  -F "uploadAccessToken=<UPLOAD_ACCESS_TOKEN>" \
"<UPLOAD_URL>"| Form field | Required | Notes |
|---|---|---|
file | yes | The raw file (multipart) |
sessionId | yes | From the step 1 response |
uploadAccessToken | yes | From the step 1 response |
This second request is authorised by the short-lived uploadAccessToken, so it does not need the Authorization header. Send only these three fields. A successful upload returns 200 and reports the stored file under documentVault.successfulFiles.
The 50 MB per-file limit applies to API uploads just as it does in the panel. Uploaded files appear in the Document Vault panel the next time it is opened or refreshed.
Note: If an issue has no existing Document Vault attachments, the first upload automatically creates the storage record it needs, so no prior setup on the issue is required.
Single-request Upload - DEPRECATED
This single-request upload is deprecated and retained only for existing integrations. New integrations should use the two-step upload session above.
POST a JSON body with the file contents base64-encoded in the content field. An optional comment is stored with the attachment:
curl -i \
  -X POST \
  -H "Accept: application/json" \
  -H "Authorization: Basic <BASIC_AUTH_TOKEN>" \
  -H "Content-Type: application/json" \
  -d '{
    "filename": "notes.txt",
    "mimeType": "text/plain",
    "content": "SGVsbG8gRG9jdW1lbnQgVmF1bHQ=",
    "comment": "uploaded from api"
  }' \
"<WEBTRIGGER_URL>/issue/PROJ-123/attachments"| Field | Required | Notes |
|---|---|---|
filename | yes | Display name of the attachment |
mimeType | yes | The file’s MIME type, e.g. image/png |
content | yes | The file bytes, base64-encoded |
comment | no | Stored with the attachment |
A successful upload returns 200 with wasSuccessful: true. The response lists each stored file in successfulFiles and any file that could not be stored in errorFiles. This method is only suitable for small files; larger files must use the two-step upload session above.
Responses and errors
Successful responses use a status of 200. The most common error responses are:
400 Invalid issue key or id– the issue reference is not a valid Jira issue key or id400attachment-not-found – the supplied attachment id does not belong to the issue400no files supplied – aPOSTwas made without anyfilefield401 Invalid or expired invocation token– the Forge invocation token is stale or invalid; obtain a fresh token and retry401 No Jira access token available for this user– the user has not opened Document Vault in the current session401 User can not add attachments to Document Vault for this issue– the user has read-only or no access and cannot upload